Monday, November 11, 2013

Easy Sesame Chicken


Easy Sesame Chicken


Hi Guys! This is the part where I beg for your forgiveness 
and promise to never ever let this much time pass between blog posts.. 
(Insert excuses HERE)

Life gets in the way and I tend to put blogging on the back burner,
 but here I am... 
Trying to make things right :)

Forgive me??? 

I promise this wait was worth it! 
Well, if you like Sesame Chicken...

And if you don't, we shouldn't be friends anyway...
Just saying...


As easy as this may be, 
some of the ingredients may not just be sitting around in your pantry. 
Just trust me, you will be making this so often, 
you won't mind having to make an extra grocery trip.

Plus, you can whip up a batch of this in less time than the 
delivery guy takes to find your address and deliver it cold.
Oh and BONUS: it cost less than 1/2 the price and you get triple the amount!

You can thank me later...

Let's get to the good stuff!


Ingredients for Chicken

1 lb boneless, skinless chicken thighs - cut into bite size pieces
2 Tbsp cornstarch
1 Egg

Ingredients for Sauce

1 Tbsp water
2 Tbsp soy sauce
1/2 Tbsp sesame oil
1 1/2 Tbsp brown sugar
1 1/2 Tbsp rice vinegar
1 inch ginger, grated
1 clove garlic, grated
1 Tbsp cornstarch
2 Tbsp sesame seeds


First clean and cut up the chicken thighs into bite-size pieces. 
You can use chicken breasts if you'd like.

In a separate bowl, whisk together the cornstarch and egg. 
Add a pinch or two of salt and black pepper.

Let the chicken pieces sit in the mixture while you clean up your workstation. 


Heat 2 Tbsp of vegetable oil in a large skillet to medium high and add the chicken mixture.
Let it cook, stirring only occasionally. 
In a about 7 minutes or so, the chicken should be golden brown and cook through.


While you are not standing over your chicken, stirring like a maniac,
you should be making the sauce.

I made a double batch here because... well.. why not!

Mix together the 
water, soy sauce, sesame oil, brown sugar, 
rice vinegar, ginger, garlic, cornstarch 
and sesame seeds


When the chicken is golden brown, pour in the sauce mixture.
Mix to coat the chicken and heat through. 

As you are stirring, the sauce will thicken. 
Stir until the sauce is a consistency that you like. 
I like mine to be a honey consistency.


Serve with any type of rice that you like.
I used Basmati rice.

This taste just like, if not better, than that boring Chinese takeout!
You can hold me to that!


I hope this makes up for neglecting you all for so long!
I will try my best to come around more often! ;)


ENJOY!!!


Sunday, June 23, 2013

Lolo's Chicken & Waffles


The Reason To Visit ARIZONA!!


Touched down in Phoenix and I felt like I might burst into flames!!!
Have you ever experienced 114 degree weather? 
Oh not to mention, it stayed that hot for the entire 2 weeks! 
Top that off with being surrounded by only Mexican restaurants and no TUMS in your purse...
Yeah... It took me a few days to adjust.
But one day in our air conditioned training center, I regained consciousness, 
and the words
LOLO'S CHICKEN & WAFFLES
were spoken..
I haven't been the same since!


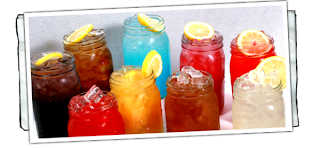
Walked in and saw this...
HELL YEAH!
KoolAid makes everything better. Order up your favorite flavor and get in a huge mason jar!
Flavors consists of RED, BLUE, PURPLE... And so on...
If you don't know your KoolAid Flavors, shame on you!
Oh and by the way.. they will add a shot of liquor if you so please.


There are two locations in AZ. 
One is Scottsdale, where I was training and one in Phoenix, the original. 
It's southern fried chicken at it's best and I would recommend this in a heartbeat!

The menu it just plain hilarious. Written for only those with a sense of humor!
The food is AMAZING... Hence the reason for this post. 


Looks messy? It is! 
But I had no shame waddling out of there with butter on my face!
Just sayin'

If you have the pleasure of eating here, Order up the waffles and obviously the fried chicken. 
My side of choice would be the Mac and Cheese but in all honesty, it all tastes like heaven!


The waffles are HUGE and don't you dare say "hold the butter"!
After all, what would a ginormous waffle be without an entire POUND of butter on it?
Just kidding.. it's more like half a pound... No dieters allowed! ;)

They have a row of waffle irons so you won't be waiting too long 
but to be honest, I'd wait hours for one of these... 
Well maybe like 20mins..


Oh did I mention the cornbread? I thought I would be getting just a standard sized corn muffin...
WRONG!!!
My meal came with a fist sized, over the top corn muffin with.. you guessed it..
More butter...
Like Honey BooBoo says.. Mo' Butta Mo' Betta...

Oh boy.... I'm quoting Honey BooBoo now...
This can't be good.


If by the end of your meal, somehow, someway, you have room in your tummy...
Well...
Red Velvet Cake it is! 
Sweet, Moist, Heaven sent....

Food Coma is 3...2...1


If you're ever in the area...
Check them out!
I promise you won't be disappointed!
And when you wake from your food induced slumber...
Feel free to thank me! 


Sunday, June 2, 2013

Chicken Alfredo

Chicken Alfredo

Hello strangers!! 
I don't even have an excuse for not blogging in over a month.. 
So lets skip that part! 
As I type now, I'm about 30,000 feet in the air somewhere between
Boston, MA and Pheonix, AZ. 
I got super excited that I could use wifi on the plane until I realized
 that Netflix is not supported and well... 
Here I am with $14.99 worth of wifi and nothing much to do with it...
l mean there's only so much of Pinterest that can keep me entertained... 
I looked through my Instagram and found a picture of a dish that I've been meaning to blog about... Now since I'm limited to my iPad and and only one picture... 
This isn't going to be like my usual "step by step with a picture" recipes. 
Sorry about that! 
But hey, me thinking of you at 30,000 feet should count for something right? 
Forgive me? 


So here we go....

I've been making this dish for some years now and I swear, 
every time I make it , it gets better. 
You might recall that in my first post, 
I was a little embarrassed that I was using a store bought Alfredo sauce... 
Well this recipe is why. 
You'll never buy another bottle of that a average stuff again... 
It's just too easy to whip up this one from scratch!


Alfredo Sauce Recipe
1 stick of unsalted butter
1 package of cream cheese
1 cup of milk
1 cup of Parmesan cheese
2-3 table spoons of minced garlic or garlic powder


Chicken 
4 large chicken breast cut into small cubes
Garlic
Vegetable oil
Basil or dried Italian seasoning
Salt
Pepper


The Rest
1 box of pasta
3 cups of broccoli florets (optional)
Shredded carrots (optional)
Baby spinach (optional)


Dice up the chicken, season and cook until golden brown. Set aside. 
If you're in a rush to make dinner, 
you can always buy a rotisserie chicken, 
take the meat off and chop up. 
I've done is in the past and it works just fine! 
See that? 
I'm being such a good helper! 
Remember that the next time I don't blog for months on end... ;)

Lets get to the sauce. 
You can boil the water and cook the pasta in a separate pot while making the Alfredo sauce. 
It's pretty quick to whip up. 
When the pasta is almost finished, toss in the broccoli and cover. 
You just need a quick blanch on the broccoli so using a whole separate pot would just be silly. 
Tip #2.. You're welcome! 

In a medium/large sauce pan, melt the butter and cream cheese. 
If you are using fresh garlic, add that in before the cream cheese and let it sauté. 
If you're using garlic powder, which i would recommend, save that for the end. 
Use a whisk to mix and melt thoroughly. 
Your heat should be on low/medium to avoid burning and you should be constantly whisking. 
This mixture will not "become one" in the pot, if that makes sense. 
You will basically have a melted butter and melted cream cheese concoction... 
Don't be alarmed! 
Add the milk, turn up the heat and continue to whisk. 
It should all begin to blend together. 
At this point, add the garlic powder, of that was your choice and the Parmesan cheese. 
Keep mixing until it is creamy and smooth. 
Turn down the heat and let it simmer. 
Toss in the chicken, pasta, broccoli, baby spinach and shredded carrots and mix all together. 
Transfer to a pretty bowl and serve up with a side of garlic bread! 
It will thicken as it cools and believe me when I say, it tastes even better the next day!!

Sorry again about the lack of pictures and for neglecting you all for so long! 
I'll try my best to keep keep up when i get back. 
Two weeks will fly by :) 


ENJOY!!!! 

Friday, May 10, 2013

Spicy Chicken Pasta


Spicy Chicken Pasta


Oh Hey Guys!!! Long time, no blog!!! 
I've been kinda busy with life and haven't really had the chance to sit down at the computer and type. 
The cooking hasn't stopped though...
You can always keep up with my day to day life on my instagram
but I must warn you, I'm not very interesting.. lol

Anywhooo...
This dish is my "copycat" recipe of Cheesecake Factory's Louisiana Chicken Pasta.
Shhh... Don't tell them!
This is my go to dish whenever I get to Cheesecake Factory, which isn't often enough..
So, I decided to learn how to make it at home!!
Of course it's not the same, but it's pretty darn close!!!

RECIPE:

Chicken:
Thin Sliced Chicken Breasts
Panko Bread Crumbs
Crushed Red Pepper Flakes (to taste)
Parmesan Cheese
Eggs

Pasta:
1 Box Bow Tie Pasta
4Tbsp Butter
1 Medium Red Onion
4 Garlic Cloves, Minced
Crushed Red Pepper Flakes (to taste)
1 Red Pepper, Chopped
1 Orange Pepper, Chopped
1-2 Cups Mushrooms, Sliced
1 Can Low-Sodium Chicken Stock
1 Pint Heavy Cream
2 Cup Parmesan Cheese
1/4 Cup Fresh Basil
1 Pack Cream Cheese
Salt & Pepper to taste


Heat a large pan to medium heat and add butter. Toss is the onions, red and orange peppers. 


Saute this for a about a minute and then toss in the mushrooms. 
Cook until tender. 
Add the garlic and combine.
You don't want to cook the garlic for long, 
just until you get smell of amazing Garlic-ness <--- Yes, that's a word in my book!
Add the amount of red pepper flakes that you want.
I obviously added quite a bit because I'm a dare devil but you can adjust to your liking.
I would warn you to add a little at first. You can always adjust later.


At this point, add the chicken stock, heavy cream, cream cheese and basil and let simmer.
Once it starts to thicken, add the Parmesan cheese. 
Now I said to add 2 cups but I sometimes add more or less. 
I also toss in some freshly grated Parmesan cheese at the end, 
but let's not get ahead of ourselves...
Taste your sauce now and add more red pepper flakes if you would like.


Cook the pasta according to the package. Drain and combine with the sauce.


Now let's get to the chicken.
You can always get boneless chicken breasts and pound it thin.. 
But I'm not into all of that hard labor..
So, I use thin sliced breast.


In three separate containers, lay out the flour, eggs, and panko.
In the panko, add Parmesan cheese. I used 2 cups of panko and 1 cup of cheese.
So, basically 2 to 1. I also added more red pepper flakes.
Dip chicken into flour, then eggs, then panko mixture.
Fry in vegetable oil at medium heat.


This recipe is always a hit!
The Mr. loves this so much, he requested it 3 times in the past 2 weeks!
It takes a little bit of work, but it's so worth it!!!


ENJOY!!!


Monday, April 22, 2013

Buffalo Chicken Cheese Balls

Buffalo Chicken Cheese Balls


I've been pretty obsessed with Pinterest lately and came across a recipe for
buffalo chicken cheese balls. I followed the exact recipe 
but it just wasn't the greatest
thing I ever ate.. 
So I changed it!
There I go again, saving the world and such...

This masterpiece right here is not only a deliciousness overload,
but as usual, it's as simple as can be!


RECIPE

1 Rotisserie Chicken, Cooked
2 Cups Sharp Cheddar Cheese
1/2 Cup Franks Hot Sauce
4 Stalks of Green Onion
5 Sprigs of Cilantro
2 Jalapenos
1 Tbsp Garlic Power
2 Eggs
Panko Bread Crumbs
All Purpose Flour


Pull apart the rotisserie chicken. Shred the meat and discard the skin and bones. 
Dice up the green onions, cilantro, and jalapenos. 
Most of the hot pepper action lives in the jalapeno seeds, so discard those. 
Add the cheese and hot sauce.
Mix this all together until you are able to form a ball out of the mixture.
This works best when the chicken is still warm.


Form the mixture into little balls and set aside.


Put the flour, eggs and panko into three separate bowls/plates. 
Roll the balls in the flour, dip into the eggs and roll in the panko to coat.
I know that seems like a excessive amount of coating
but this keeps the cheese from just melting and falling apart while frying.


This is what you will get. ^
Deep fry these in vegetable oil at medium heat until golden brown.


There you go! 
Little morsels of goodness!!
Pile high and serve with a side of blue cheese!


ENJOY!!!


Sunday, April 21, 2013

Note to Readers


I want to thank every single one of you! 

This blog has only been active for 12 days and has already received over 2,000 page views!

I've been able to post every day so far but I have to take a break from this for a little while.
I will still be posting often, just not every single day.

A new chapter in my life will begin very soon and I need to get myself ready for that!

To keep up with this blog, please follow me on BlogLovin.
Just follow the link and sign up. 
It's free and you will get an email whenever I post!

Add my Blog:
nadiamirandacooks.blogspot.com

Thank you again for your support!!!
See you all soon! 

XOXOXO
Nadia

Friday, April 19, 2013

Bonbons


 Bonbons


I'm kind of giggling as is write this because childhood memories are flashing back!!!

Do you know what bonbons are? 


According to Wikepidia:

"The name bonbon (or bon-bons) refers to any of several types of sweets, 
especially small candies enrobed in chocolate.
The first reports of bonbons come from the 17th century, 
when they were made at the French royal court..." 
Blah blah blah...

Let get real here.
Peggy Bundy ate bonbons and that's the only reason we know what they are.
Oh that skinny, leopard print wearing, big red hair having, sexually frustrated woman..
She was AWESOME!! 
That family never had enough money for bread and butter but 
somehow Peggy always had bonbons while she watched Oprah!
Oh how I miss that show... 
As horrible of a production as it was, It was part of growing up in the 90's...
Memories...

Ok, Ok... Enough of that..
Back to the bonbons...
Basically they are the back in time version of what cake pops are today;
Minus the sticks.

Recipe
Box Cake Mix
Can of Frosting
Baker's Chocolate
Baking Decorations
Food Coloring


I used boxed cake mix because I'm not one of those people who can pull a cake recipe out of thin air.
You on the other hand, can use what ever cake recipe that you know.

Bake the cake according to the directions on the package. 


Let the cake cool and crumble into a bowl with about 1/4 of the frosting from the can.


Use your hands to mix this all together. It should be the consistency of dough.
Able to stick together and not falling apart.


Roll into bite-sized balls and place into freezer 
for about 20 minutes (or overnight).


Melt the chocolate according to the directions on package.
Dip cake balls into chocolate and place onto wax paper.
I used white chocolate and orange food coloring.
If you want to mold the chocolate and add decorations, 
now would be the time to do so.
Work fast because the chocolate will set pretty quick 
because of the coldness of the frozen cake.

I used the back of a spoon to twirl the chocolate around the cake to make it look fancy
You know how much I like to be fancy!
I also added edible pearl decorations. 
Let the bonbons come back to room temperature before eating.


Serve on a fancy little plate and pretend that you are royal..
... or just eat 'em off of the wax paper and pretend you are Peggy Bundy.
Whatever floats your boat!

Don't forget the leopard print!


ENJOY!!!